



Key Takeaways
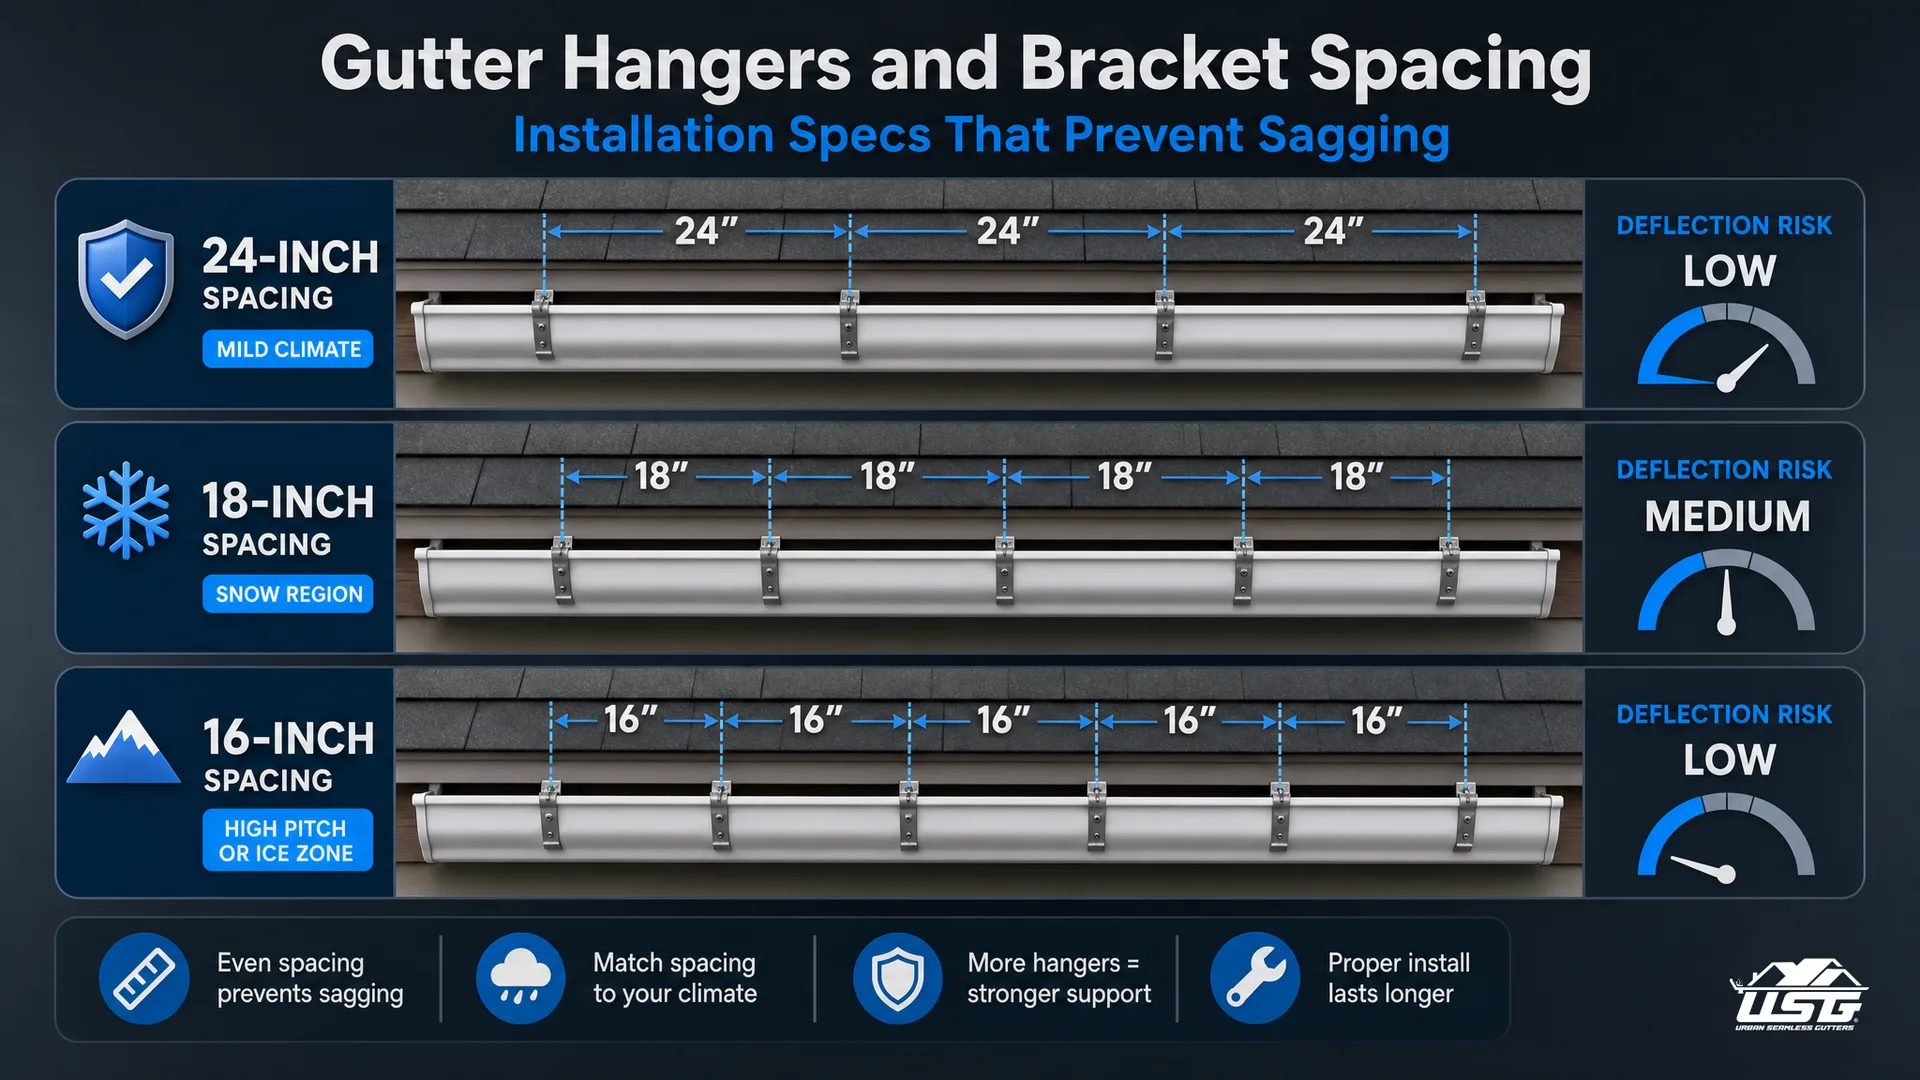
- Standard spacing for gutter hangers is every 24 inches in mild climates, tightened to every 18 inches or less in high-snow regions like Albany.
- Hangers spaced too far apart create deflection points where gutters sag, separate, and eventually leak behind the fascia.
- Material type, roof pitch, and gutter profile all influence the correct hanger interval.
- Common mistakes include over-spacing, shallow fastener penetration, and using the wrong hanger style for the load.
- When sagging is already visible, professional re-hanging or full replacement is often more cost-effective than repeated patch repairs.
- Spacing for gutter hangers should be 18 inches or less for homes in the Capital Region, where ice loads and freeze-thaw cycles put extra stress on every support point.
- The standard 24-inch spacing is a maximum for mild climates, not a universal target for New York winters.
Why Gutter Hanger Spacing Matters More Than Most Homeowners Realize
Your gutters handle a surprising amount of weight. A single foot of standard 5-inch aluminum gutter can hold several gallons of water when clogged, and that volume multiplies quickly across a 40-foot run. Add wet leaves, ice buildup, or snow accumulation common to the Albany area, and the load on each hanger grows considerably.
Proper spacing for gutter hangers is the single most important structural factor in how long a gutter system lasts. Too much distance between supports, and the gutter material deflects, pulls fasteners loose, and eventually separates from the fascia entirely.
How improper spacing leads to sagging, leaks, and water damage
When hangers are set too far apart, the unsupported span between them acts like a flexible beam under load. Water pooling in that low spot accelerates the problem: standing water adds weight, which increases deflection, which makes the low spot deeper, which collects even more water. It’s a self-reinforcing cycle.
Once the gutter starts pulling away from the fascia, water begins running behind the channel instead of through it. That moisture reaches the fascia board, soffit, and eventually the wall framing. What started as a minor spacing error can turn into rot, mold, and costly structural repairs.
The structural failure chain: weight, deflection, and failure points
The failure sequence is predictable. First, the gutter visibly dips between hangers. Then the fasteners start to back out as freeze-thaw cycles in Capital Region winters repeatedly stress the connection.
Finally, the gutter separates enough that end caps, joints, and downspout connections all lose their seal. You’ll see water staining on the siding and saturated soil right along the foundation, which is exactly where you don’t want it.
Understanding this chain makes clear why correct hanger placement isn’t something to shortcut on a new installation or skip when re-hanging an older system.
Standard Spacing Guidelines for Gutter Hangers
Spacing recommendations exist across a range, and that range exists for a reason. The right interval depends on several overlapping factors, not just a single universal rule.
Industry guidance generally calls for gutter hangers spaced no more than 24 inches apart in mild climates, and no more than 18 inches apart in regions with significant snow or ice loads.
The 16-inch to 24-inch rule: what the specs really say
The 16-inch to 24-inch spacing window is the most widely cited standard in professional gutter installation. For most residential applications in low-snow areas, 24 inches on center is acceptable. But here in Albany and the broader Capital Region, where winter ice loads are a real annual concern, tightening that interval to 18 inches is the more defensible choice.
Some installers working in high-pitch roofs or areas with very heavy rainfall push spacing down to 16 inches to handle the surge volume during storms. According to guidance from Alsco Metals on gutter hanger installation, the 24-inch standard is a ceiling, not a target, and regional conditions should always push spacing tighter rather than looser.
How material type affects optimal spacing
Not all gutter materials behave the same under load. Here’s how the most common options compare:
| Material | Typical Weight | Recommended Max Spacing | Notes |
|---|---|---|---|
| Aluminum (standard) | Light | 24 in (mild), 18 in (snow regions) | Most common residential choice |
| Aluminum (heavy-gauge) | Moderate | 24 in | Holds shape better between hangers |
| Steel | Heavy | 18, 24 in | More rigid but heavier on fasteners |
| Vinyl | Light but flexible | 18 in max | Most prone to sagging under heat and load |
| Copper | Heavy | 18 in | Requires stainless or copper fasteners |
Vinyl is worth calling out specifically. It softens in summer heat and becomes brittle in winter cold, so vinyl gutters need closer hanger spacing than the label might suggest. Homeowners who choose vinyl for cost savings often find they need more hangers per run, which narrows the price difference.
Adjusting spacing for climate, roof pitch, and gutter profile
A steeper roof pitch sends water down faster, meaning gutters fill and drain more rapidly during a storm. That’s actually less demanding on the support structure. A low-slope roof, by contrast, sends water slowly into the gutter where it sits longer, adding sustained load.
In the Capital Region’s freeze-thaw environment, ice dams forming at the eave line can push hundreds of pounds of ice into the gutter channel. That’s a load no hanger spacing can fully absorb, but tighter placement at 16-inch intervals near the eaves reduces how far ice can lever a section away from the fascia before the next support point catches it. For more on how Albany’s climate affects your full gutter system, the seamless gutter installation guide for New York’s Capital Region walks through local considerations in detail.
Common Installation Mistakes That Cause Sagging
Most sagging gutter problems trace back to a handful of repeatable errors. Knowing what they are helps you evaluate whether existing gutters were installed correctly and what a new installation should look like.
Over-spacing hangers to save time and materials
Stretching hanger placement to 36 inches or more is one of the most common DIY and low-bid contractor shortcuts. It cuts material cost by a third and reduces installation time, but the structural penalty shows up within the first winter or two. In Albany’s climate, the first serious ice event often reveals over-spaced gutters dramatically.
Misaligned fasteners and inadequate anchor penetration
Even correctly spaced hangers fail if the fasteners don’t hit solid wood. The screw or spike needs to reach the rafter tail or solid fascia backing, not just the thin fascia board skin. A fastener that’s only threading into fascia sheathing will pull through under ice load.
Using wrong hanger type for gutter weight and pitch
Spike-and-ferrule systems, once standard, are now largely obsolete for good reason: the spike loosens over time as the fascia board cycles through moisture and temperature changes. Hidden hangers with hex-head screws provide a far more secure, adjustable connection. For heavier gutter profiles or longer runs, strap hangers anchored to the rafter are worth the added effort.
Calculating the Right Hanger Spacing for Your Roof
Getting the math right before you buy hangers saves trips to the hardware store and prevents gaps in coverage.
Measuring run length and determining total hanger count
To figure out how many gutter hangers per foot you need, divide your total gutter run length by your chosen spacing interval, then add one for the starting hanger. A 40-foot run at 18-inch spacing requires approximately 27 hangers. At 24-inch spacing, that same run takes 21 hangers.
The difference in cost is minor; the difference in structural performance over a Capital Region winter is not.
A quick reference:
| Run Length | Spacing @ 24 in | Spacing @ 18 in | Spacing @ 16 in |
|---|---|---|---|
| 20 ft | 11 hangers | 14 hangers | 16 hangers |
| 40 ft | 21 hangers | 27 hangers | 31 hangers |
| 60 ft | 31 hangers | 41 hangers | 46 hangers |
Accounting for corners, downspouts, and transition points
Always place a hanger within 6 inches of each end, inside corners, and immediately adjacent to downspout outlets. These are the highest-stress points in any gutter run. Skipping support at a corner joint or end cap allows the unsealed point to flex and eventually leak.
For guidance on the full replacement process, gutter replacement services in New York’s Capital Region covers what a professional re-hanging typically involves from start to finish.
Installation Best Practices to Prevent Future Sagging
Knowing the right spacing interval is only half the battle. Execution matters just as much.
Pre-installation layout and marking the hanger locations
Before driving a single screw, snap a chalk line along the fascia at the correct gutter slope angle, typically a quarter-inch drop per 10 feet of run toward the downspout. Mark hanger locations along that line at your chosen interval. This step prevents the common mistake of installing hangers at inconsistent heights, which creates dips and high spots that trap water.
Fastener selection, torque specs, and testing for movement
Use hex-head self-tapping screws rated for exterior use, at least #10 gauge for most residential aluminum gutters. Drive screws until snug but not over-torqued: stripping the hole in the fascia defeats the purpose. After installation, push laterally on each gutter section.
If it moves more than a quarter-inch, the hangeror needs a closer-spaced hanger to stabilize it.
When to Call a Professional and What to Expect
DIY gutter work is manageable for straightforward repairs, but spacing for gutter hangers across a full run requires accurate layout, the right fasteners, and an honest assessment of what the existing fascia can support. Some situations clearly call for a professional.
Signs your existing gutters need professional re-hanging or replacement
Look along your roofline from the ground after a rain. If you see water overflowing at any point other than a downspout, or if the gutter channel visibly dips between hangers, those are reliable indicators of a support problem. Other warning signs include:
- Gutters pulling away from the fascia with a visible gap at the top
- Rust streaks or paint peeling on the fascia board directly behind the gutter
- End caps or mitered corners that have separated or are leaking
- Gutters that rock or shift when you push them by hand from a ladder
- Sagging sections that return after you’ve re-hung them once already
Repeated sagging in the same spot usually means the fascia board behind it has softened from water intrusion. Re-hanging into rotted wood accomplishes nothing. That’s a situation where you need both fascia repair and new gutter installation done together, or the problem returns within a season.
If you’re uncertain whether your gutters need repair, re-hanging, or full replacement, the guide on when to repair, clean, add guards, or replace seamless gutters helps you work through that decision clearly.
What professional installers check during inspection and repair
A professional gutter inspection covers more than just the visible sag. Here’s what a trained installer evaluates before recommending re-hanging or replacement:
| Inspection Point | What They’re Looking For | Why It Matters |
|---|---|---|
| Fascia board condition | Soft spots, rot, delamination | Determines whether re-hanging will hold |
| Existing hanger spacing | Measurement between current hangers | Confirms whether spacing caused the failure |
| Fastener condition | Backed-out spikes, stripped screw holes | Identifies whether new holes are needed |
| Gutter slope | Chalk line or level check along the run | Ensures water drains toward the downspout |
| Gutter profile integrity | Dents, cracks, warped sections | Flags whether the channel itself needs replacing |
| Downspout connections | Loose outlets, improper sealing | Prevents leaks at the highest-stress joints |
A proper re-hang on an existing system means pulling the old hangers, assessing each fastener hole, repositioning at the correct interval, and driving new screws into solid rafter tails wherever the old holes are compromised. It’s not a job that benefits from rushing.
For homeowners across Albany, Schenectady, Clifton Park, and Saratoga Springs, Urban Seamless Gutters’ professional gutter installation services include a full inspection before any work begins so you know exactly what you’re dealing with.

Frequently Asked Questions
How many gutter hangers per foot do I actually need?
How many gutter hangers per foot you need depends on your spacing interval. At 24-inch spacing, you’ll use about one hanger every 2 feet. At 18-inch spacing, that works out to roughly one hanger every 1.5 feet.
For a 40-foot gutter run in a snow-prone climate, plan on 27 to 31 hangers depending on how tight you set the interval.
Always add one hanger at each end and place extras at corners and downspout outlets. It’s better to buy a few extra than to discover you’re short mid-installation on a cold October afternoon.
What is the correct spacing for gutter hangers in a cold climate like Albany?
In a cold climate with significant snow and ice, 18 inches on center is the recommended standard for spacing for gutter hangers. Some installers working on steep-pitch roofs or homes with a history of ice dams tighten that to 16 inches near the eaves, where ice loads are most concentrated.
The gutter hanger spacing guidance from Alsco Metals reinforces that 24-inch spacing is a ceiling figure for mild conditions, and that colder, wetter regions should consistently use tighter intervals.
Can I install gutter hangers myself, or should I hire a professional?
Single-story gutter work with straightforward fascia access is manageable for a confident DIYer. You’ll need a ladder, a chalk line, a cordless drill, the right screws, and a helper to hold the gutter section while you fasten it. The American Hill Country Gutters spacing guide is a useful reference for calculating your hanger count before you start.
That said, if your fascia shows any signs of rot, if the roofline is complex with multiple inside corners and valleys, or if you’re working above one story, hiring a professional is the safer and more reliable choice. A mis-hung gutter on a two-story home is a much bigger problem to fix than one on a ranch-style house.
How do I know if my gutters are sagging because of hanger spacing or something else?
The clearest sign of a hanger spacing problem is a visible dip between two support points, especially when the gutter is otherwise intact with no cracks or separation. If the sag is evenly distributed across a long section with no obvious damage, spacing is almost certainly the cause.
If you see cracking at a joint, separation at a mitered corner, or leaking around a downspout outlet, those are more likely to be sealant failures or damage from impact. Both issues can coexist, so a visual inspection from a ladder before deciding on the repair approach is always worth the effort.
What type of gutter hanger is best for aluminum seamless gutters?
Hidden hangers with hex-head exterior screws are the current industry standard for seamless aluminum gutters. They clip inside the gutter channel so they’re invisible from the street, they allow slight expansion and contraction as temperatures change, and the screw connection holds far better over time than the older spike-and-ferrule systems.
Spike-and-ferrule hangers are still available but are generally considered obsolete for new installations. If your home currently has spike hangers and they’re backing out, that’s a strong signal to upgrade to hidden hangers during any re-hanging work. The Weatherguard Gutters installation overview covers the differences between hanger types and why the switch matters for long-term performance.
How does roof pitch affect how many hangers I need?
A steeper roof pitch accelerates water flow into the gutter, which means the channel fills and drains faster. That’s generally less stressful on the support structure. However, a steep pitch also increases the downward pull on the gutter itself at the eave, so hangers near the top of the run need solid fastener penetration.
For low-pitch roofs, water drains slowly and sits in the gutter longer, creating more sustained load. That justifies tighter hanger spacing to prevent mid-span deflection under the added weight. As a general rule, any roof with a pitch under 3:12 benefits from 18-inch hanger spacing even in a mild climate.
 Ready for a free quote? Share a few details with Urban Seamless Gutters, we’ll help you choose the right next step. Get a Free Quote |